Sunday, February 26, 2017

Vintage Hairstyling--The Middy Cut

It has probably been about a decade since I entered the realm of 1920s-1940s vintage admiration.  As far as fashion goes, I think many know that the late '30s through 1940s are my favorite years, and one of my biggest ambitions is to achieve the hairstyles of that era.  Finally conquering hair rolls was such a triumph, but as for the curls and overall shape of the hair?  That has been an ongoing frustration!...That is, until recently.

For too long, I believed that, in order to do the vintage hairstyles, my hair had to be all one length.  Pin curls and using hot rollers worked great, but something was lacking.

My pin curl style in 2011.


I would view photos and movies of some of my style inspirations like Rita Hayworth, Ava Gardner, Gene Tierney, et al, and wonder WHY I could not get my hair nice and curly in front with those soft waves in the back...

Rita Hayworth


Ava Gardner--look at how the curls frame her face and only the lower border of the back of her hair.  That's what I want!


The ethereal Gene Tierney


One day, I happened to be browsing vintage hair stylists on Instagram, and noticed one mentioned giving a client a "horseshoe trim."  What?  I looked this up and only found some...erm...interesting buzz cut styles!  So, I hit YouTube to see what I could find out about vintage hair cuts.

This video about vintage haircuts by Lisa FreemontStreet mentioned "the middy cut," which I had never heard of before!


I downloaded the image of the "middy plus" hairstyle and went to work a bit nervously on my hair.  I had vowed to never have layers again, as I thought it would hinder my ability to do rolls, but I've since styled very layered hair on other women, so I thought...Why not?  Time for a slight change anyway, isn't it?  I kept it longer than recommended in the diagram, as I knew that it would be shorter after curling.

My result the next day, after setting it in pin curls the night before...
First cut and curl result in December.
I was fairly happy with the result, yet felt something was still missing...


Turns out what was missing was a good brush-out!  My hair in the picture below looks longer in the above photo because the tight curls have been brushed into waves.

After a brush-out...And with a little roll in front. :)


Still, wanted to experiment some more, and shortened one side of my "bangs" some more, to get a more face-framing curl.  It turned out shorter than I wanted, but still, okay.

After trimming the front bangs and setting in pin curls.

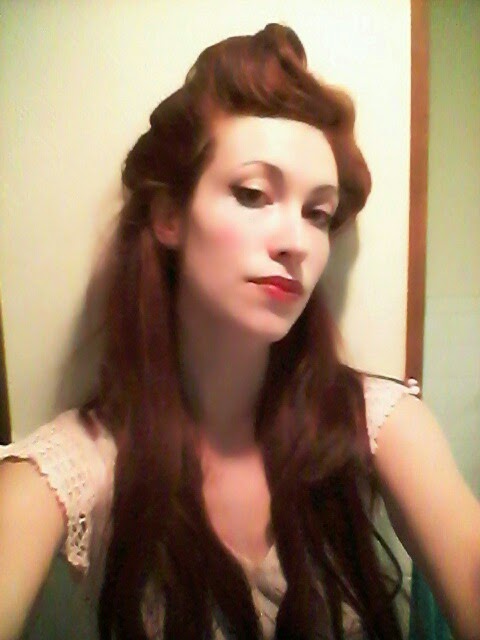
I'm slowly getting to where I want my style to be, I think, though I have a lot to learn about curler placement, and especially about using hot rollers, which is a very different experience since getting the middy.

This is how it looks now, after styling with hot rollers.  Getting closer to that vintage style!
The last two photos are both from this month!  This hairstyle can look so different depending on how you style it.  Above, I brushed out the shortened bangs to make them a bit longer, and I like the almost pageboy curl in the back.  Now we're getting places!

Well, I'll keep trying to get the more authentic look that I've been wanting, and also I'm going to experiment with hair rolls and up-dos.  I'm happy so far with the versatility of the middy cut, and also that I have less hair, so it washes and dries faster, yet I can still style it.

So don't be afraid to try out a middy cut!  If you go to a salon, make sure they know how to do this style the old-fashioned way, and don't let them use razor shears or thinning scissors, as you'll get a totally different effect.  The hair looks a bit choppy when it isn't styled, so if you don't want to dedicate to styling it on a regular basis, this cut might not be for you.

Interested in more in-depth styling tutorials?  Let me know in a comment below!  Thanks for reading!

Tuesday, November 22, 2016

The Timeless Turban

A style that pops up again and again throughout fashion history is the turban--whether it be a tied scarf or hat.  Not only timeless, this look can also be practical; it allows the wearer to hide pin curls, a bad hair day, or can simply be used to jazz up a "look" for a time out on the town!

I'm not sure when turbans became fashionable for women's wear, but while they are mostly associated with 1920s or 1940s head wear, they can also be seen in some designs of the 1910s.

1911 Paul Poirot designs; "sultana" skirts, harem pants, and "turban" style hats!


 I think my favorite "look" for the turban hats began in the 1920s.  Hats that were close to the head, such as the cloche, were very popular among women who had cropped their hair, and the turban style was an alternative option for head covering.

Hungarian actress Lucy Doraine


Janet Gaynor


In the 1940s, the turban was popular again (or still?), both in elegant hat styles, and also in wrapped head scarf form to hide and protect the hair, as many women were working in factories for the war effort.

1944, California: Lockheed employee works on a P-38 Lightning.  See how her scarf is tied around her hair a little in the turban fashion?


In contrast to the 1920s, the 1940s turbans showed a bit more of hair and were often embellished with flowers, ribbons, and other frills.

Sometimes, a thin scarf was wrapped around the nape of the neck and tied at the crown, either in a bow or ruffles.
With the 1940s turban, hair was often worn down in back, as well.

Some '40s turban styles were quite flamboyant, as you can see in this Revlon ad!


Even after the war, the turban persisted for lounge wear.  Can we forget Lana Turner in the Postman Always Rings Twice, in her all-white wardrobe and matching turban?


I don't have many turban hats, but I often like to tie scarves around my head on days when I have to go out with wet or messy hair.

Me in a scarf tied "turban style".
And I happen to have one turban hat, which I do cherish!


What do you think of turban styles for women over the years?  Do you have a favorite look or style, and do you own any?

Would you like a tutorial to see how I tie long scarves in to "turbans"?  Let me know!  As always, thanks for reading!

Monday, November 21, 2016

It's Been a Long, Long Time...

I haven't blogged in the longest time.

To be honest, I didn't miss it for a while, but it was only recently that I remembered this blog and the mission: to help those who can't afford real or reproduction vintage to achieve a vintage "look".  I'm hosting a 1930s party for my birthday next week, and scouring thrift shops for clothing that would work for it, to help inspire my guests.  Might be a post for the near future!

So, it has been a couple of years...What has happened in my life?  Lots of changes, some good, some bad.  I had a mini break down, and writing has been difficult since then, but I am working at it!  I also put my business on hold and got two jobs, first at a movie theater, then as a florist.  When the florist closed down, I decided it was time to focus on Eliza Cosmetics once again!  I am still hard at work with new, vintage-inspired makeup and perfume, but I'll get to that later.

Life lately has been very hectic and a struggle.  I lost my father in July, very unexpectedly and traumatically, I won't go into detail on this post.  My dad was a very strong foundation to me my entire life.  He lost his battle to trigeminal neuralgia, one of the most painful medical conditions known. 

My father in the 1950s.


Surviving family was not the kindest to me about my loss, and I was reminded once again why sometimes, no matter your relation to someone, you have to leave behind those who are toxic to you. 

Anyway, I've been struggling with coping with the loss, dealing with the traumatic way in which it happened, handling legal issues that come with being an executor of an estate, and improvements on the home--especially now that winter is on the way!

Repainting the living room! 'Turquoise Powder.'  

But, life goes on, and as someone who has been self-conscious and struggled with depression for a long time, I have to say that vintage style is one of the biggest things that lifts me up.  So, it's time for me to get back to it, and therefore maybe I'll give this blogging business another go.

Eliza Cosmetics has improved quite a bit, and I'm pretty happy with the direction I'm going in, especially since I found Perfumers Apprentice.  They supply high-quality perfuming ingredients, so now I feel like my perfumes are much more professional than ever before.  My latest project is the ongoing Classic Hollywood Perfume collection, inspired by signature scents of old Hollywood actresses!  My lipsticks are named after actresses of the Golden Era of film, so I found it was only fitting to name my perfumes after the characters they played in their films.

Clockwise from left: 'Scarlett,' inspired by 'Joy' by Jean Patou; 'Zouzou', after Guerlain's 'Sous Le Vent'; 'Kitty', styled after Acqua di Parma Colonia; and 'Lili,' inspired by 'Angelique Encens' by Creed.

Researching vintage perfumes is so fun, and it is intriguing to me to attempt the evocation of the scent of eras past, all while maintaining attributes that are appealing to the modern nose.

My latest venture is Glam-O-Luxe designs, vintage style jewelry inspired by lucite, bakelite, and celluloid styles.  It's still really in its infancy, but the Etsy shop is slowly stocking up with new items.  My earrings are available in clip-on or stud backs!


Well, I suppose that's enough for now.  Any requests for future posts?  Suggestions for topics or even tutorials are welcome!

Tuesday, November 4, 2014

Irresistible Me Hair Extensions

Hello, lovelies!

Recently, I had the privilege of trying out the luxurious royal remy hair extensions made by the company Irresistible Me.

The box got a bit mushed in shipping, but the contents were safe!


The extensions come in a two-part packet; one side is sealed and contains all ten wefts, wrapped in a hair-net; the other has a little sample piece for you to test against your natural hair.


DO NOT break the seal of the one side until you are sure you have the correct color and you want to keep these extensions.  Once you open that sealed side of the packet, you void your chance of return--the extensions are yours!


I watched the video sent to me (via Glamour Daze) from Maddy at Irresistible Me.  This informative short educates the viewer on the lengths, weights, and shades available in the royal remy clip-in extensions.

Irresistible Me Hair Extension Colors--Video

I thought #33 'Ginger' was closest to my natural color.

Preliminary cell phone shot with extensions in!

 Some fun and helpful facts about Irresistible Me hair extensions:

-They are 100% royal remy, which is pure human hair, which means that they can be cut, dyed, or curled, just like your own hair.

-Extensions do not receive your natural scalp oils, so some special treatment is required to keep them healthy-looking.  Use a wide tooth comb on them and always start with the bottom (ends) first.

-Remove the extensions before washing your own hair or showering, but do wash them on their own from time to time.  (Between 5-6 wears is recommended.)  Use shampoo and conditioner for chemically treated hair, and rinse each extension separately.  Avoid twisting, scrubbing, or rubbing the hair.  Be sure to rinse thoroughly, as damage can be done to the hair from residue.  As far as water goes, use gentle pressure and a mild temperature.  Gently blot with a towel to remove excess water.

-If you wish to dry your extensions with a hair dryer, use a heat-protection spray on them, first.  Otherwise, let them air-dry 80% before using a hair dryer on them.

-Treat your extensions as well as you would treat your own hair--and better!  Make sure to use a good moisturizer on them, and brush/comb them gently before washing.

-After clipping in each weft, your extensions will have to be blended.  Gently comb or brush through your hair after application, avoiding brushing too close to the clips.  You can then style the extensions to match your hair.


Interested in trying hair extensions?  You can use this link to get 10% off your order, using the code IrresistibleTia http://bit.ly/IM_Hair366

Stay tuned for future posts on my own personal experience with styling and caring for my Irresistible Me hair extensions!

(sneak peak of a vintage style I'll be showing you how to do with extensions!)


Thanks for reading!

Friday, January 24, 2014

A Return.

Goodness!

I'm not going to even look at the date on my last post--it really has been too long.  My life has been a bit--crazy--not in the best of ways, and not in the sense of "hectic".  Won't go into details with that, though.  I'm sorry to say that my love for vintage has suffered during this depressive episode, but I'm trying to return to it.  Trying to return to my soul, and to encourage my soul to return to me.

So, what all is new?  I've been doing a few new hobbies: jewelry making, Chinese brush painting, wire wrapping rings.  I haven't written in ages, just can't seem to get the inspiration or motivation to do that yet.  And what a cold winter it has been here!  That certainly doesn't add to the motivation issue, either.

The most exciting news I have is that I now have an ETSY SHOP for my makeup!  I've made a couple of sales and have found lots of great shops.  Please stop by and pay me a visit!

Wednesday, December 26, 2012

Eliza Girl!

My company has a new logo!  Ever since I read about the "Maybelline Girl" of the 1930s, I wanted my cosmetics brand to have an "Eliza Girl".  Even before that though, I was thinking about a logo that would be a simple portrait of a woman's face, preferably with a 1930s flavor.  I had the crazy idea that I could do this myself.  I bought some pastels in the summer and started practicing, and seemed to make very little progress.

Well, over the weekend, it seems I got lucky!  Here is the new logo for Eliza Fragrances & Cosmetics:


'Eliza Girl', copyright Tia Semer.


You can read more about the development of this logo here.

Monday, December 17, 2012

Out of the Ordinary...


The late 1930s and early 1940s are my typical comfort zones.  So here I am sporting a '50s look!  I tried to pencil in my eyebrows to give them that angular look that seemed so popular in the '50s.  :)


Different.  The pearls are genuine 1950s; they were my grandmother's.  Unfortunately, the pearl finish is coming off some of them and I'm unsure of how they can be restored.  :(